Objective
An RV backup camera shows a picture and nothing else. There is no way to tell from it whether the post behind you is four feet away or twelve, and the last three feet of a reversing manoeuvre are the ones that cost money. The usual remedy is to replace a perfectly good display with a head unit that draws guide lines — expensive, and the lines it draws were never measured against your vehicle.
RV Backup Helper takes the other route. You measure the real world once, behind your own bumper, and the application turns those measurements into an Arduino sketch that overlays them on the live camera picture. The camera stays, the display stays, and the lines are true because they came from a pole laid in your own driveway.
Who it is for
- RV and travel-trailer owners whose factory camera came with the coach and whose factory display draws nothing on it
- Anyone backing onto a hitch — the 1 ft line is drawn heavier than the rest, because it is the “about to touch something” line
- Long overhangs and fifth wheels, where a generic stick-on guideline assumes a vehicle it has never seen
- Installers and RV techs — one calibration per coach, saved as a small file, regenerated into a sketch in one click
- Makers and Arduino people — an Uno, a shield, and about forty dollars of parts; the generated sketch is plain, commented C you can read
How It Works
An RV backup camera is analogue composite video — the same signal television used before HDMI. That is unglamorous, and it is exactly why this works: composite carries brightness and timing on a single wire, so a chip can lock to that timing and inject extra brightness on top without understanding the picture at all. The trick is old. Broadcast character generators did it for captions in the 1970s, and radio-controlled aircraft have used it for decades to put battery voltage over a live camera feed.
The alternative — digitise the video, draw on it, re-encode it — is easier to write and wrong for this job, because it puts a computer between the driver and the rear view. The analogue overlay adds no stage to the signal path. If the board dies, the camera passes straight through and the driver simply sees no lines: not a frozen frame, not a blank screen.
Capture
- Scan Devices finds capture hardware and lists it by its Windows name, so a USB grabber is easy to tell from a webcam
- A device with nothing plugged into it is listed as no video rather than hidden, and capture started on one begins the moment video arrives — which is what an RV camera powered only in reverse gear needs
- Arduino Grid: On / Off blanks the shield's overlay over the serial port, so calibration footage is recorded through a clean camera rather than through the grid you are trying to replace
Calibrate
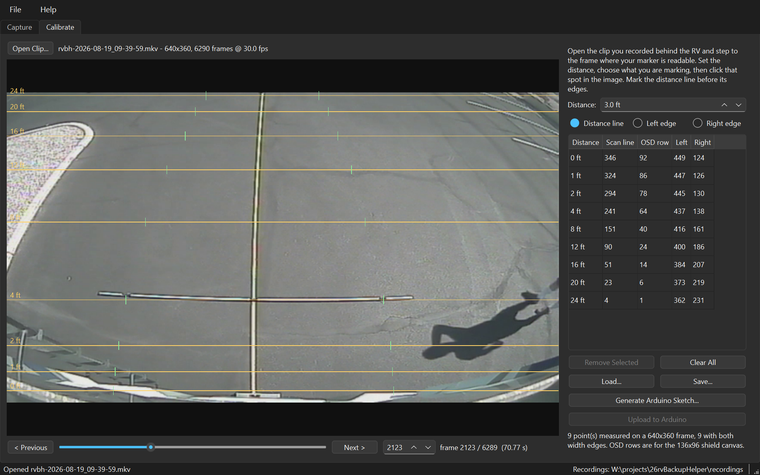
- Open the recorded clip, step to the frame where your marker is readable, set the distance, and click that spot in the picture; an amber guide is drawn where you clicked
- Mark the RV's width at each distance too, and the corridor is drawn as a polyline through your points rather than a straight taper — a wide-angle lens bends what is really a straight path into a curve across the picture
- Every point records the video frame it came from, because the pole is carried to a new distance for each shot
- The result is a small JSON file: the one artefact here that cannot be reproduced without another trip to the vehicle
Generate and upload
- Generate Arduino Sketch turns the measurements into C, each row carrying the scan line and frame it came from, so a line that looks wrong on the vehicle can be traced back to the moment it was measured
- Upload to Arduino compiles and flashes it directly — the Arduino IDE is never required — and reports the board's own size summary, so you see what actually landed rather than an assumption
- Help → Check Hardware and Check Toolchain answer “will this machine work?” before you drive anywhere. The toolchain check compiles something, because every check short of building a sketch once insisted a missing component was installed
What the grid looks like
Horizontal lines mark the distances you measured, each label set into a break in its own line so there is no doubt which belongs to which. The dashed pair is the width of your RV, drawn through the points you marked. The 1 ft line is heavier.
The overlay is monochrome, and that is hardware rather than taste: it is one bit per pixel, and NTSC colour would need a subcarrier the microcontroller cannot generate while it is also locking to the camera. Line weight is therefore the only hierarchy available — and thickness grows downward, so a heavier line never makes an obstacle look closer than it is.
What you need
- An Arduino Uno R3 or Duemilanove. It must be an ATmega328P — not an Uno R4, whose Renesas chip cannot run the hand-written AVR assembly the video library is built from
- A Nootropic Design Video Experimenter shield, which is the overlay hardware itself
- A USB video capture dongle, to record the camera onto a PC for the calibration session. It is not needed once the board is flashed and in the vehicle
- RCA leads, and a long pole with the RV's width marked on it. The pole is the measuring instrument
What it will not do
It cannot skip the measuring. There is no template, no vehicle database and no guess: the lines exist because you laid a pole behind your own bumper and clicked it. That is an afternoon, once, and it is the whole reason the result is worth trusting.
It is also not a proximity sensor and not a warning system. It draws where the ground was when you measured it, on flat ground. A slope, a kerb, or something hanging above the ground is not what the lines describe. It is a better rear view, not a substitute for using it.
Download
Free Windows installer — Python is bundled, so there is no prerequisite of any kind.
Download for Windows Source on GitHubThe button brings you to the GitHub release page: scroll down to the Assets section and click rvBackupHelperSetup-1.0.0.exe. The install is per-user, so there is no administrator prompt and nothing lands in Program Files.
The wizard runs its hardware check on the page after Welcome, before a single file is written, so somebody with no capture device finds out in five seconds rather than after a download. The Arduino AVR core is a tick box at the end — it is a 295 MB download, and only uploading to the board needs it.
Windows may show a SmartScreen notice on first run because the download is unsigned; choose “More info”, then “Run anyway”. The application runs on Windows 10 and 11. The board and the shield, once flashed, have nothing to do with any operating system.
 Visit the RV Backup Helper Site
The whole job walked through in ten steps, with screenshots.
The User ManualFive pages: the rig, recording, calibrating, flashing, and the enclosure.
The Video Experimenter ShieldThe overlay hardware, from Nootropic Design. Not ours, but worth reading before ordering.
Support This Work
RV Backup Helper is free and open source. There is no licence to buy, no seat to renew, no account to make, and nothing about you is collected or sent anywhere. That is also why software like this is hard to sustain: there is no subscription to bill and no data to sell, so nothing pays for the work behind it.
Most of what is in this application came from getting it wrong first. A whole calibration session was lost to a grid left switched on, burned into the footage on top of the very markings that needed clicking. A working day went to a video library that compiles perfectly and then leaves the board answering nothing. Those afternoons are the reason the traps are written down in the manual, and the reason the application checks the things it checks before you drive anywhere.
If this saved you a new head unit, an installer's afternoon, or a bumper, please consider chipping in. It genuinely makes the difference between a project that keeps improving and one that quietly stops.
DonateSecure payment through PayPal — no account required, and any amount is appreciated. Thank you for supporting independent, open source software.